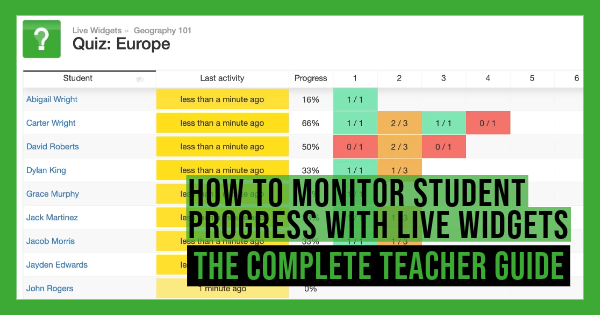
How to Monitor Student Progress with Live Widgets - The Complete Teacher Guide
 Lucie Renard —
Live Widgets? BookWidgets? If you’re reading this blog post, you’re probably already familiar with both of these terms. If it doesn’t ring a bell, you’re in for the biggest discovery of your teacher lifetime! I’ll explain everything to you below.
In this blog post teacher guide, you’ll learn how you can monitor student activity in real-time while they are working on a BookWidgets activity.
On the agenda (Click on the title to jump):
- What is BookWidgets?
- What is “Live Widgets”
- How to set up “Live Widgets”
- The “Live Widgets” dashboard explained
- What data do you get in “Live Widgets” for every widget?
- Creative lesson ideas with Live Widgets
Let’s get started! 👇

What is BookWidgets?
For those unfamiliar with BookWidgets, a short introduction: BookWidgets is a content creation and evaluation tool for teachers. It enables you to create interactive activities - over 40 widgets (= exercise templates) and auto-graded assignments - over 35 question types! Here’s an example of a worksheet widget with all question types.
When the creation part is done, you share the activity - or widget - with your students (through an LMS), and you’ll be able to monitor student progress live while students are working on your activity. When your students submit their work, you can review it efficiently, with a comprehensive reporting dashboard, allowing you to add personalized feedback comments and choose how to return the feedback to your students. In short: An all-in-one tool to 1. create, 2. share, 3. monitor live progress, and 4. review student activities.

What is Live Widgets?
If you take the number 3 out of everything the BookWidgets tool can do for teachers, you get to “Live Widgets”. The feature allows you to monitor your student’s progress in real-time, while they are working on your BookWidgets activities.
So why should you use “Live Widgets” in your classroom? The biggest advantage of monitoring your students’ progress - live - is discovering struggling students who need bigger challenges much faster. You can offer them help when they need it and not when it’s already too late.
As you get a lot of data for each widget type, there are many more advantages of Live Widgets. I’ll show you later on what those advantages are for each widget. One other possibility that is a huge benefit is the fact that you, the teacher, can force a student to submit their work. It’s often used when students forget to hit the “Submit” button. This way, you can still retrieve the results.

How to set up Live Widgets
Setting up Live Widgets is easy when you follow these steps:
1. Integrate BookWidgets with an LMS
As BookWidgets is not a learning management system, we need to find a way to connect students to the widget activities they are making. The solution is to connect BookWidgets with an LMS. When you integrate BookWidgets into an exciting learning management system, you can identify students and what they’re doing in that exact moment.
So, the most important rule in order for Live Widgets to work is to connect BookWidgets with your LMS. Here’s a list of Learning Management Systems BookWidgets integrates with: Google Classroom, Microsoft Teams, Canvas, Schoology, Moodle, Blackboard, Brightspace, and itslearning. Make sure to check out the teacher and admin tutorials (under the LMS Integration section) on how to connect BookWidgets with your LMS.
2. Enable “Live Widgets”
When you’ve connected your BookWidgets account to an LMS, you must enable the Live Widgets feature, as it’s not turned on by default. To do this, log into your BookWidgets account via the website - bookwidgets.com and go to “Account”. Scroll down until you see “Live Widgets” and enable “Track live widgets”. You only have to do this once. Live Widgets will be enabled for all the widgets that support live monitoring - except for the Flashcards, WebQuests, and the Arithmetic widget. Here, you must enable “Tracking of live activity” in the widget itself.
3. Open the Live Widgets dashboard
Now you’ve shared a widget with your students through your connected LMS, students can open the activity and start working. Your students will get a message briefly: “Your widget activity is shared with your teacher”. This means that your students are aware that their activity and progress can be monitored by you. Students will only see this message when you’ve activated “Live Widgets” (in the previous step).
When your students are working on the BookWidgets activity, you can navigate to the Live Widgets dashboard. There are a few ways to get to the Live Widgets dashboard:
Via the BookWidgets website: The easiest way to pull up the Live Widgets dashboard is to find the one in your BookWidgets account (the account that’s connected to your LMS) via the BookWidgets website. On the left, go to “Live Widgets” and click on the LMS course you want to monitor, then click on the widget name to open the live data for that widget.
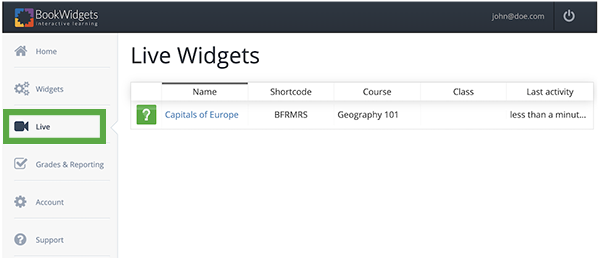
Via your LMS: In case your LMS integrates the BookWidgets results, grades & reporting dashboard (e.g. Canvas or Schoology), you can also find your live widgets in the dashboard under the “Live Widgets” link on the top right.

For Google Classroom users, you can access the Live Widgets Dashboard directly from the BookWidgets Google Chrome extension icon.


The Live Widgets dashboard explained
For each widget activity, you get a different set of data you can use to guide your students in the best direction possible. Of course, you get the most data from a Quiz, Video Quiz, Worksheet, or Split Worksheet widget. So I’ll take that Live Widgets dashboard as an example to explain the basics. Check out the screenshot below to get a clear understanding of the dashboard.
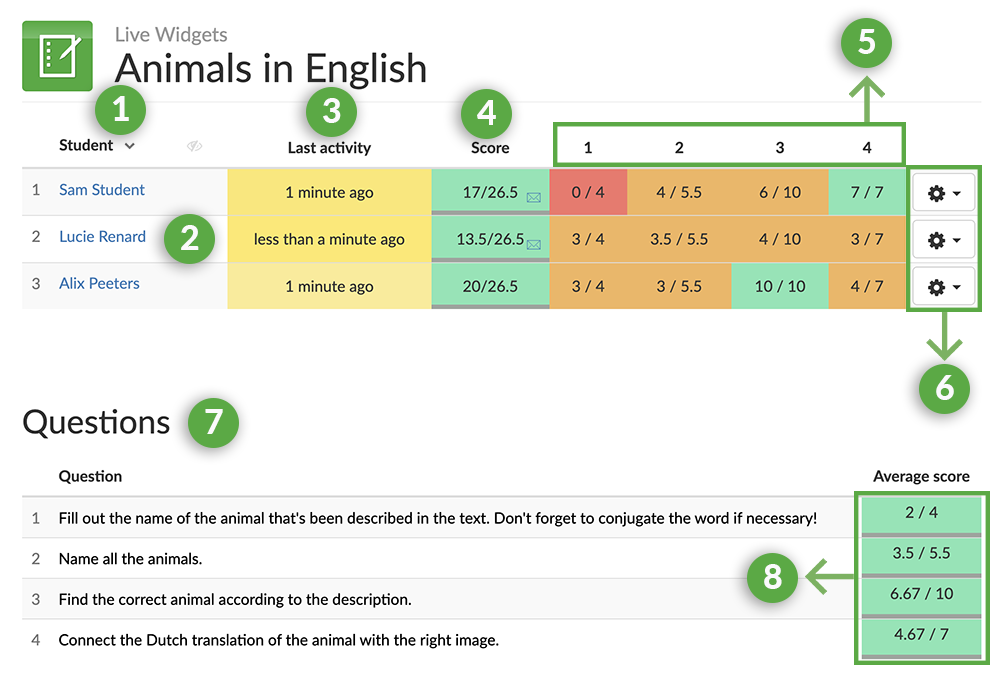
According to the numbers on the image, I’ll go over the Live Widgets Dashboard basics.
- Student: In this list, all your students who opened the activity in the past 7 days (you can return to 30 days) show up. If you miss a student, they didn’t open or complete the activity. If, for some reason, you want to demonstrate your Live Widgets dashboard to your classroom or another teacher, you can use the eye icon to blur the students’ names. Click on the student name column header to sort by name.
- Student name: Clicking an individual student name will open that student’s work. When the live statistics show some mistakes, you can open the work and see if that student needs help. Opening up a student’s work is only possible for the following widget types: Quiz, Video Quiz, Worksheet, Split Worksheet, Whiteboard, Split Whiteboard, Planner, and Checklist.
- Last activity: Find your students’ last activity in the widget. A few minutes ago, a few hours ago, or a few days. When your students work in the activity as we speak, the box will be bright yellow. When your students have stopped working for a few minutes, the yellow will diminish and become white. This way, you might discover students who are stuck and need help. When you hover over the last activity box, you can see the first date and time the students opened the activity and the specific last activity.
- Score: Here, you get the score at the moment your students are going through your activity. When your students finish the activity, it’s also the final score (remember, if you included questions that don’t automatically grade, it’s not the exact final score). You can sort the scores to see your top students and students that might need help. This way, you can group students who need extra instructions or students who can be a buddy to others for that lesson. There’s more… You can see a progress bar at the bottom of the score box, and when students submit their work to you, you’ll find a small envelope next to the score. When you’re missing a student’s submission, you can come and check the live dashboard if they didn’t just forget to click the submit button. And you can do something about this… Keep reading to find out!
- Question numbers: For the Quiz, Video Quiz, Worksheet, and Split Worksheet widgets, the questions will show as numbers. You can hover the number, and the specific question will appear. Most questions in BookWidgets get auto-graded, so the score the students get on the questions will also show. If they answered the questions completely incorrectly, the box will turn red. It will turn green if the answer is correct and orange if it is anything in between. Questions that are not auto-graded will get a blue color.
- The cogwheel: On the right end of the student, you can find a cogwheel icon. Here, you can take two actions as a teacher. First, you can submit the work of a student yourself. For example, when they forget to submit their work themselves. Second, you can delete the student from the live widget dashboard, allowing them to do the activity again. You’re resetting their widget.
- The questions below: This is only visible for a Quiz, Video Quiz, Worksheet, and Split Worksheet. You can click on the separate questions and open the question view for all your students. Here, you can see all your students’ answers - live - for each question at a time.
- Average score: Again, this one is only visible for a Quiz, Video Quiz, Worksheet, and Split Worksheet. When (all) your students have answered a question, you can see the average auto-graded score for each question. This gives you some interesting insights into the lesson content your students understand and don’t understand. This way, you can revise and give additional instructions for the next lesson.
That being said, every widget has different live statistics that show in the live widgets dashboard. And that’s something I’ll show in the next part: “What data do you get in “Live Widgets” for every widget?“. I’ll also include some innovative lesson ideas with the Live Widgets Dashboard for each widget.

What data do you get in “Live Widgets” for every widget
We already reviewed the live information you get from a BookWidgets Quiz, Video Quiz, Worksheet, and Split Worksheet. Now, I’d like to show you what the many other widgets display and how you can interpret the data for your classroom. For each widget, I’ll give you an innovative lesson idea with that Live Widgets Dashboard.
1. Whiteboard and Split Whiteboard
 With these widgets, your students can get really creative. Let’s take a look at two lesson examples created with these widgets.
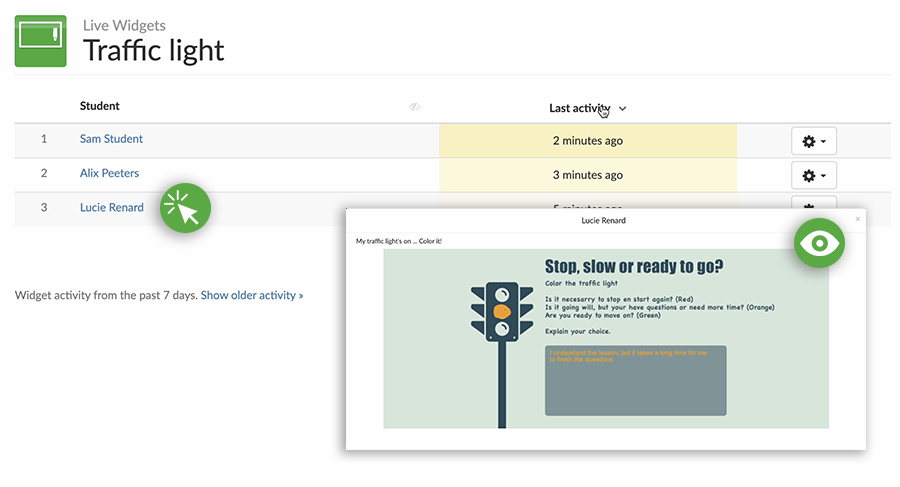
Here’s a whiteboard widget in which students need to indicate whether they are ready to move to a new topic. Check out this traffic light whiteboard lesson! Below, you can see what data you get - as a teacher - in the live widgets dashboard. You can open individual student work to see their (real-time) drawing on the whiteboard. You’ll be able to see the same student input in a split whiteboard widget. Here’s a fun split whiteboard widget for a digital art project!
💡 Live Widgets Lesson Idea: Digital pictionary!
Share the whiteboard widget with your students and ask them to draw something that has to do with your lesson.
For example, you’ve just taught your students about our body’s digestive system. The goal of your lesson is to practice the parts and their functions of the digestive system in a more engaging way. Ask your students to draw an organ or body part that’s in our digestive system. BUT: they don’t have to do this all at the same time. Pick out a student who needs to draw and project your live dashboard view of that student to your classroom. The other students can see the drawing appear and need to guess the part of the digestive system. When they guessed it, ask what the functions are.
2. Exit slip
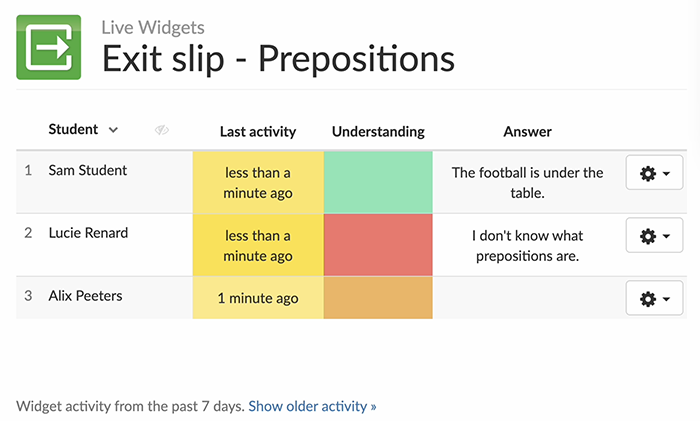
 The exit split widget gives you some handy insights on just 2 questions. As the results are gathered in a different section of the reporting dashboard, it’s even easier to check the live widgets dashboard for fast insights. An exit slip or exit ticket always has 1 goal: to get a better understanding of whether your students understood your lesson or not.
Here’s an example of an Exit Ticket Widget and check out below what you can see in the live widgets dashboard. Depending on what emoji your students pick to answer the first question, the box in the “Understanding” column will turn red, orange, or green. You can also always take a look at your student’s answers to the second question, which is always an open question.
💡 Live Widgets Lesson Idea: Different student tracks
When you’ve taught your students a new concept or brought on new lesson materials, you can use an exit slip widget at the end of your lesson to quickly gauge understanding and divide your students into 3 groups before moving on to practicing. By clicking the “Understanding” column in the live view dashboard, you can sort your students based on their answers representing the colors. Create different student tracks for your next lesson. Pair up green students with the orange students and let them be their “buddy” for this lesson. Let the green students explain the topic to the orange students. Ask your “red” students to gather around you - the teacher - and explain the basics again. These students need more instructions. Also, do the first practice round together.
3. Webquest
 This widget… where do I start? In this widget, you can bring everything together. Built a complete digital lesson and embed other widgets like quizzes, worksheets, and games right into your WebQuest lesson.
To understand what you can follow up in the live widgets dashboard, you must see an example WebQuest first.
Here is a fun WebQuest lesson example you can give your older students to test if they could walk your teacher shoes. Check out the screenshot with the numbers below.
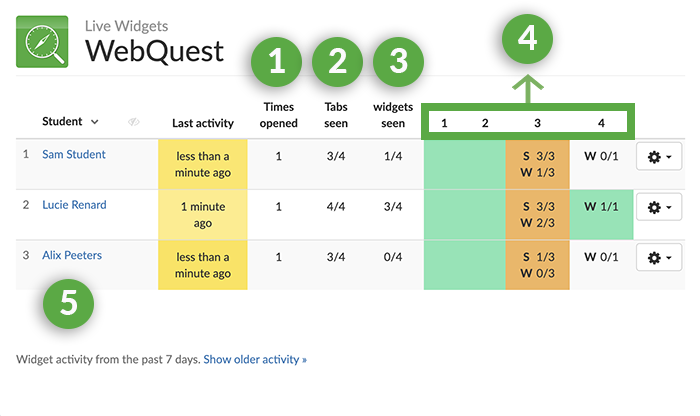
So, now you can see the live widgets statistics; it’s important to know this is only possible for the WebQuest widget if you enable “tracking of widget usage” for the individual widget. Let’s go over the screenshot above.
You can see the same recognition points in the live view from a WebQuest as we saw in the one for a Quiz or Worksheet: students and last activity. The rest is new:
- Times opened: For each student, you can see how many times they’ve opened your WebQuest. These are good statistics to have if you shared an additional practice bundle WebQuest students can use for more exercises.
- Tabs seen: As you can see in the example WebQuest, a WebQuest always has tabs at the bottom of the activity. This column shows you how many tabs your students have visited already.
- Widgets seen: Same thing goes for widgets. As a WebQuest is a “structure” widget with additional content, resources, and other widgets in it, you can see here how many widgets your students already opened. Keep an eye on your slow students, and make sure to challenge your pop-tarts.
- Tab numbers: Every tab has a number in the Live Monitoring Dashboard. When you hover over it with your mouse, you can see the title of that tab. When your students open that tab, it will color green. This way, you can keep track of your students’ progress throughout the entire WebQuest. Sometimes, a tab has some other statistics. You can find an “S”, which stands for “sections” (= when a tab is divided into different parts or sections). You’ll be able to see how many sections your students have gone through. You can also find a “W”, which stands for “widgets”. You’ll be able to see how many widgets your students have gone through for that particular tab.
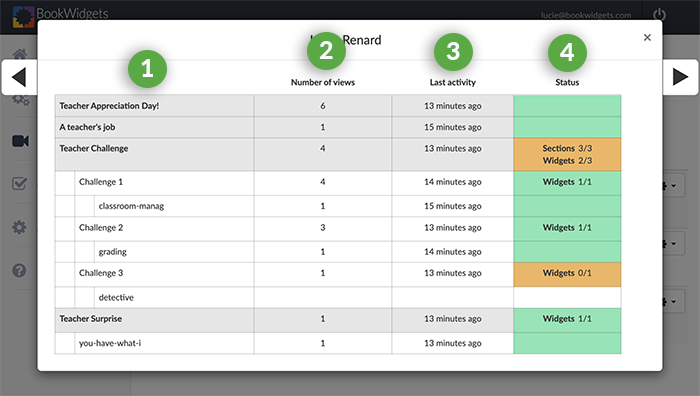
- Student name: When you click on the name of a student, you get a bunch of new statistics. Go check out another screenshot below, and let’s the individual student insights!
Let’s take a look!
- Tabs: Here, you can find the title of all your tabs, the section titles (if you have any), and the widgets (W) in your tabs or sections (S).
- Number of views: You can see how often that student viewed a tab, section, or widget.
- Last activity: get some insights on the last time your student worked on your WebQuest or specific tasks in your WebQuest.
- Status: The status will turn green when they go through the tab, through all the sections, and through all the widgets in that tab. Orange, when they haven’t completed everything (didn’t open all the widgets or just went through the first section.) And white: your student hasn’t come to this tab or widget yet.
Phew! That’s a lot of data for this widget. Now, let’s move on to the lesson idea 👇
💡Live Widgets Lesson Idea: SRL - Self-regulated learning
A WebQuest widget is the perfect fit to build an SRL lesson structure. In fact, we made a blueprint for you already. Go check out the ready-to-use SRL blueprintfor teachers here. As your students need to go through the lesson materials at a self-regulated pace, you still need to check on them and see if they can actually do this by themselves. Because self-regulation is taught. The live widgets view in this self-regulated learning WebQuest will help you monitor students’ SRL journey. You can jump in any time and help out students who need more guidance or teacher-led instructions.
4. Timeline
 Let’s start with a timeline example so you understand better how this widget works. Here’s a timeline widget students take the lead on. They have to add different events that fit the storyline of the book they just read.
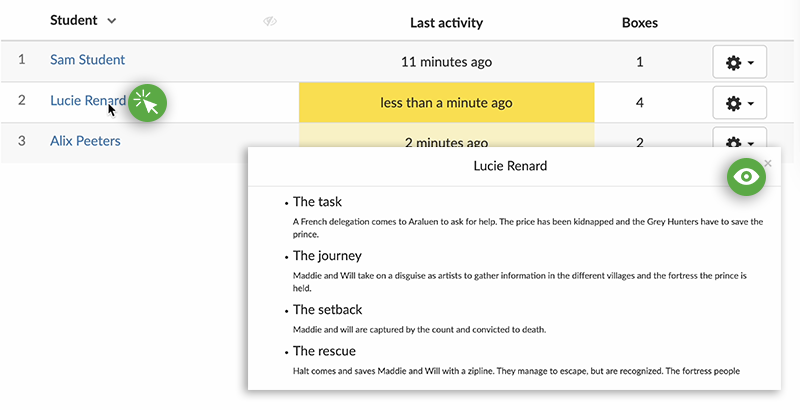
In the live view, you can see how many boxes each student already added. The boxes are the events they added to the timeline. When you click on the student’s name, you can see exactly what your students wrote down in the boxes. Even the images they uploaded to their events in the timeline.
💡 Live Widgets Lesson Idea: A STEM project
Let your students build something from scratch for their STEM project (let’s say… a cotton ball launcher). You can set the events in the timeline already. Each step of the way is in there, with a title you added. Your students have to build their cotton ball launcher based on the instruction in the timeline, and for every step of the way, they have to add a reflection/notes of the step. Your students can type their reflections directly in the box. Your students also have to add a picture of their project so far. Using the live view, you’ll be able to track student progress and see whether they missed an important detail or not. You can also find struggling students who need a bit more instruction and guidance.
A timeline widget is a great way to teach your students to reflect on different steps in a process, on what’s going right or wrong, take notes of their thinking process, and much more. Check out this blog post with 40 timeline activities for different courses.
5. Flashcards
 Flashcards are a great practicing tool! You can give your students some extra practicing materials to practice on their own time at their own pace. But, most of the time, you don’t really know if your students have been looking at your additional practice sets or exercises. If you give your students remediation activities because they need it, it’s also good to know if they are taking that extra tutoring opportunity. As students can’t really submit Flashcards, you can open your live dashboard to see if they have been practicing and how they did.
Take a look at this screenshot below, and let’s go over some statistics. But first, check out the digital flashcard activity I shared this my students.
Beware! To be able to track live activity in your flashcards widget, you need to enable “tracking of widget usage” in the “General” tab for each widget separately.
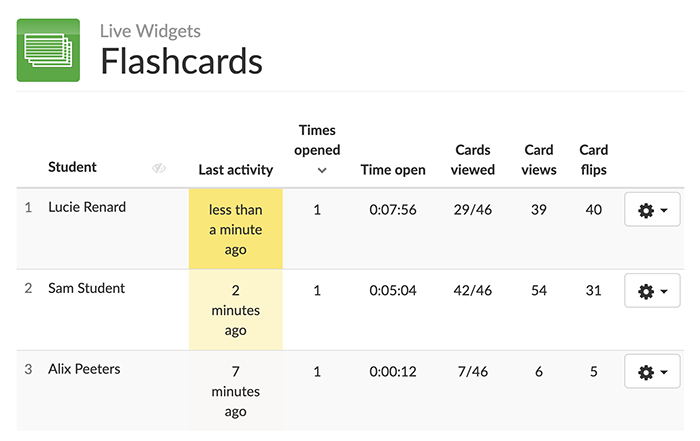
The usual information you get is the student column and your students’ last activity. As you can see, there’s more. You can see how many times a student opened the flashcards, how long your students have been practicing (= time open), how many cards of the total cards they viewed (= cards viewed), how many card views (e.g. if they watch a card multiple times), and, most importantly, how many cards they actually flipped (= card flips). That last one shows if they really checked their answer.
As you can learn from the screenshot above, Alix didn’t really give it a go. Lucie is still practicing, and Sam races through the cards without flipping them all.
💡 Live Widgets Lesson Idea: Test & practice sync
Give your students words, definitions, translations, or other terms they need to practice for an upcoming test. Let’s take the example above, where my students have an upcoming test about countries and their capitals. I provide them with the flashcards they can use for studying. After the test, I can compare my students’ practice efforts with their scores on a test. This way, I can give them personalized feedback on their work. I might even find students who really practiced a lot but just could reproduce their knowledge on the test. You’ll also find students who had a bad test but also didn’t practice.
Looking for some ready-to-use digital flashcards? You can find them in this blog post about flashcards.
6. Jigsaw puzzle
 This widget activity is probably the one that takes the least time to create and share with your students, so you might wonder what you could monitor in the real-time monitoring dashboard. Well, you can get a few handy insights.
Here’s an example of a jigsaw puzzle widget I shared with my students, and below, you can find the live insights.
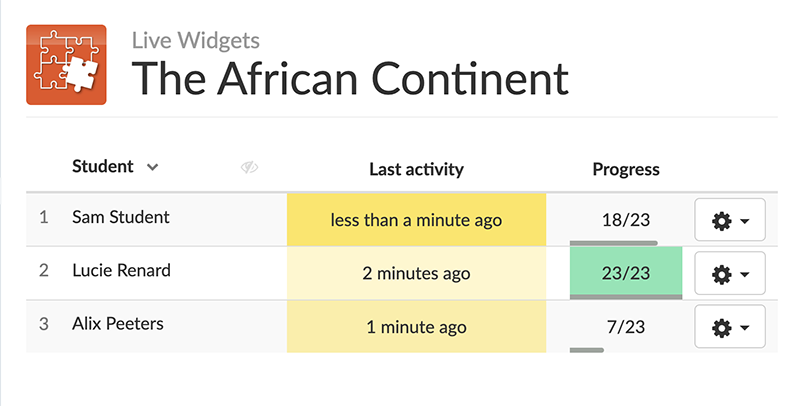
Again, just like in any other live view, you can find the list of students who opened your widget and their last activity in the widget. In the progress column, you can see how many puzzle pieces your students already matched out of the total puzzle pieces. You can also find a progress bar that gives you a clear view of your fast puzzlers and students struggling with the jigsaw puzzle.
💡Live Widgets Lesson Idea: Puzzle race!
Let your students open the jigsaw puzzle so they can start puzzling. Only today, it’s a fun puzzle race! Project your screen so your students can see their names on the board and the progress of each student. When you say “GO”, your students try to match the puzzle pieces as fast as possible. It’s a fun way to start a new lesson topic or introduce a new art project theme. And a little competition never hurts somebody! You can also pair up students to stimulate collaboration.
Looking for more jigsaw puzzle lesson ideas? Check out this fun inspirational blog post.
7. Memory Game and Pair Matching
 I shared this pair matching widget with my students so they can practice some new English words. Let’s see what I can see in the live widgets dashboard 👇
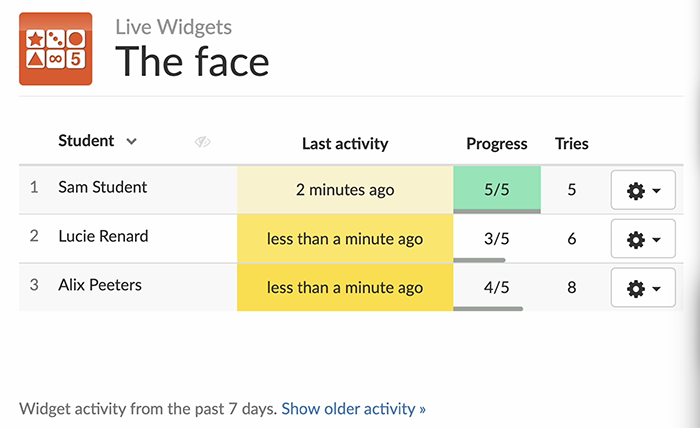
As you can learn from the live view above, you see that Alix and Lucie had some more trouble with finding the matching pairs. They found all of them but tried more times. They might be guessing, or they just don’t understand the new words. Sam, on the other hand, quickly found all the matching pairs without making any incorrect guesses or matches. You can get all this information from just the “Progress” and “Tries” columns in the live widgets dashboard.
💡Live Widgets Lesson Idea: Pair matching classroom race
Share your live widgets dashboard with your students on the big digital board (or white wall with projector), but make sure to blur your students’ names. Now, ask your students to complete their Pair Matching or Memory Game activity. But there’s more! It’s more than just finishing an activity! Explain to your students that they all have to do their activity individually, but extra tries than needed are “gathered” by the teacher in the “chores” jar. For example - There are 5 pairs to match, but a student took 7 tries. So, 2 tries go to the “chores” jar. These extra tries for all the students are counted in the end. This means that your students need to try very hard to match the pair right from the first time.
The fact that your students can see the live view (but not their names) makes it very exciting. They will start doing the math themselves and try their best in the activity (without any guessing!).
So what will happen with the tries or points in the “chores” jar? Well, these are “chores” the teacher can give to its students. For example; ask a student to wipe the classroom (1 point in the jar), ask a student to wipe the board (1 point in the jar), ask a student to hand out or to collect assignments (1 point in the jar), and so on. The jar will be cleared again the week after. Fun right?!
8. Crossword
 Ready for some riddles? With the crossword puzzle widget, you can get your students to practice and have fun while doing so. Let’s see what statistics the live dashboard will show you for crossword puzzle widgets. Here’s an example of the digital crossword activity I shared with my students.
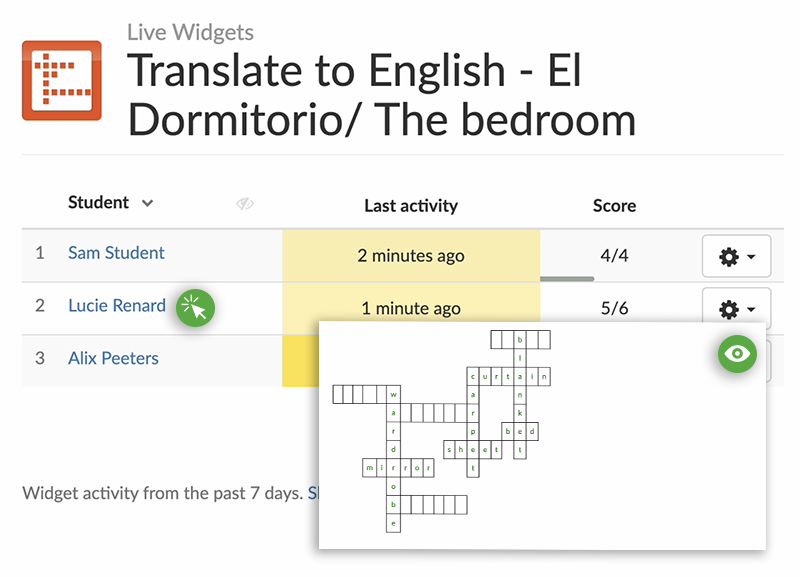
As you can see from the gif above, you can easily follow student progress as you can see their score (how many words they’ve found in the crossword puzzle) and a progress bar. You can also click on your students’ names to see the words they can find and the words that are missing.
💡Live Widgets Lesson Idea: Task groups!
Let your students complete the crossword puzzle as fast as possible. You can follow up in your live widgets dashboard who finishes first. Share the names of the 4 students who finished the entire crossword puzzle the fastest. As you divide your classroom into 4 groups, these students will choose the next task for their group.
Share 5 tasks that are related to the crossword puzzle’s content. Let’s take the one above, where the students needed to find the English translation of newly learned Spanish vocabulary. The 5 tasks your team leaders can choose from could be: 1. Write a poem using at least 5 words of the new vocabulary. 2. Write a comic using at least 5 words of the new vocabulary in the characters’ dialogues. 3. Let your students create outfits as they each “wear” the next vocabulary. 4. Let students portray a word (without saying anything!) 1-by-1. The rest of the group needs to guess. 5. Let your students turn the new vocabulary into a fun board game!
9. Word Search
 Let’s move on to the Word Search widget. Here’s a word search puzzle example of one I created and how it looks in BookWidgets. This one is already special, though, as your students don’t have a word list to start from. That’s why I also want to point out this word search activity, with a word list. Heads up: here, they don’t just have to find the exact same words…
So, what can you see in the live widgets dashboard?
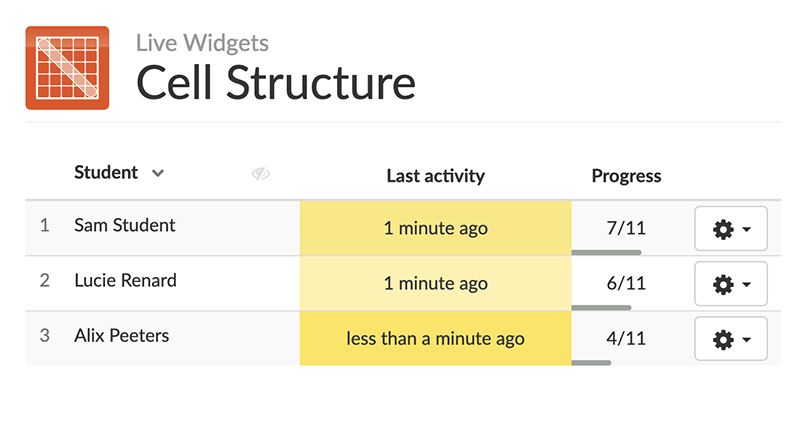
As the screenshot shows, it’s all about monitoring progress. You can see how many words of the total your students have found. The “last activity” is also a very good one as some students get stuck on the last words or find this a very challenging puzzle. Give students a helping hand when they need to.
💡Live Widgets Lesson Idea: Challenge accepted!
As you can see in the first Word Search widget I’ve shared, there’s no word list. Challenge your students to reproduce knowledge of your previous lesson, like important terms and their definitions. They may look through your course to find those keywords that might be hidden in your word search.
Your live widgets view helps you to see your students’ progress. As this activity is pretty challenging, halfway through, you can pair up fast students with slow students and go over the words they have found. They have to explain what they mean, translate them, or, in this case, the functions. This way, it’s not just a “search” activity but also one that has educational value.
10. Mind Map
 A Mind Map widget is a very simple widget where students add boxes and text to create…. A mind map. Here’s a mind map widget example and here’s what you can see live:
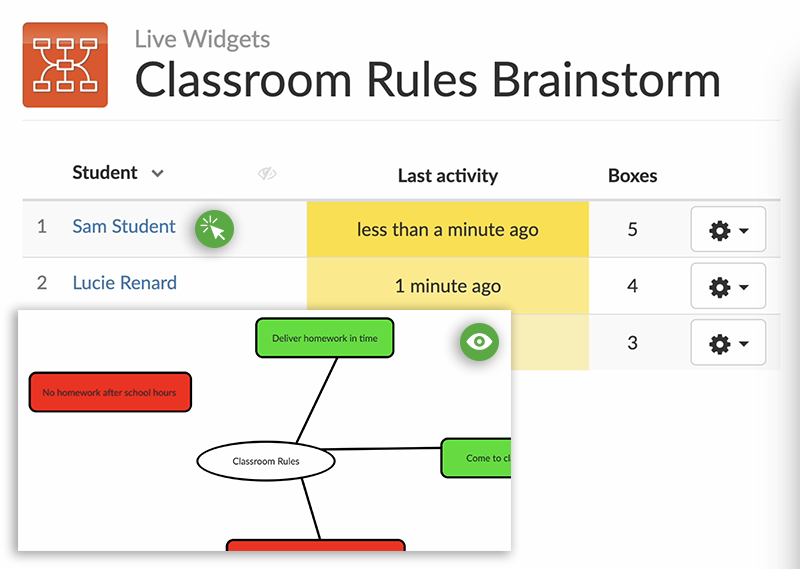
You can clearly see how many boxes your students have added, and when you click on the students’ name, you can see the content in the Mind Map.
💡 Live Widgets Lesson Idea: Character analyses
Your students individually create a mind map centered around two important novel characters (half of the classroom analyses the first, the other half the second character), exploring traits, relationships, development, and key quotations. The teacher can pull up - showing the live widgets dashboard - various students’ mind maps to discuss different character interpretations. Whether you show your students’ names in the classroom or not is up to you.
11. Snowman / Hangman
 Check out this digital snowman game where students have to guess the parts of a muscle by providing letters. If pick a letter that’s not represented in the word, a part of the snowman is drawn. If the complete snowman it there, it’s GAME OVER. (Tip: ask your students to explain the words, use them in a sentence, give a definition, a translation…)
Let’s see what we get in the real-time student monitoring dashboard.
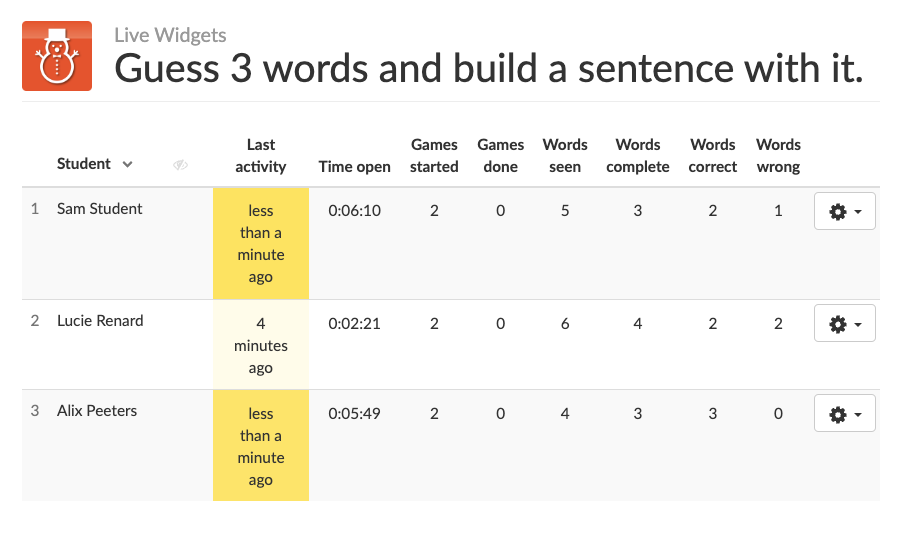
A lot! You can see how long your students practiced or played the snowman game (= Time open), How many games they’ve started playing (= Games started), how many games they completely finished, so they spelled all the words in the game (= Games done), how many of the words in the game they saw (= Words seen), How many words they completed (= Words complete), and how many of the words they completed were correct (= Words correct) or wrong (= Words wrong).
You can sort the statistics in each column to find students with the most correct words or the highest practice time. In the screenshot above, for example, you can see that Alix completed 3 words, and she got all three correct from the first time!
💡 Live Widgets Lesson Idea: Vocabulary practice corner work
Whenever your students finish an assignment early, or you have some extra practice time on your hands, you can assign fun but engaging activities to your students. Throw newly learned words for each theme in a separate hangman or snowman game. Let your students pick between a snowman game, flashcards, a word search, or a pair matching activity, and pull up the live monitoring dashboard to see what your students choose and if their practicing goes well or not.
12. Arithmetic
 As the arithmetic widget is an activity your students can’t submit, you’d like to know if your students did practice and how they did during their practice. Here’s the multiplication tables activity I shared with my students to track their performance live.
And here are the statistics I get in the live widgets dashboard.
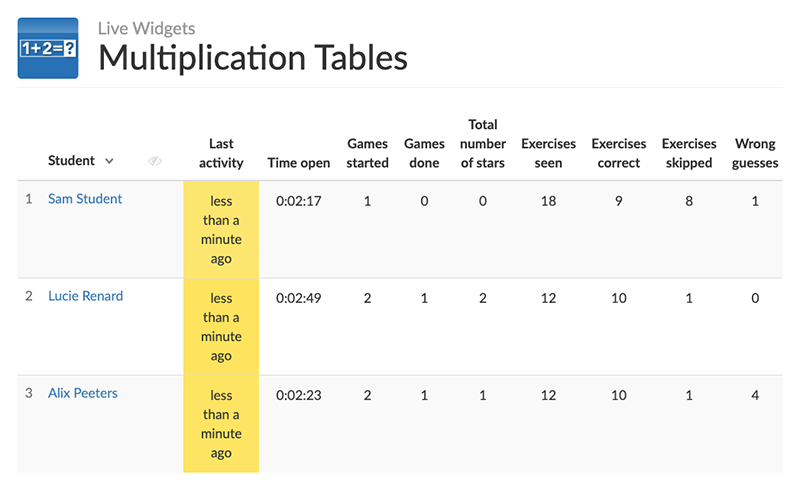
You can see how long your students practiced in the arithmetic activity (= Time open), how many games they’ve started (= Games started), how many games they completely finished (= Games done), how many of the words in the game they saw (= Words seen), How many stars they got in all their games so far (= Total number of stars), how many exercises they have seen (= Exercises seen), how many of those were answered correct (= Exercises correct), how many of the exercise were skipped (= Exercises skipped) and how many of the exercises where wrong (= Wrong guesses).
💡 Live Widgets Lesson Idea: Reward your practice role models!
Shared this activity with students to practice on their own time. Add an incentive to it to engage your students even more. As the live widgets dashboard gives you information about how long your students have practiced, you can award those students with the highest practice time, for example, a homework question they don’t have to solve. There are so many more fun things you can do to incentivize your students. This is just 1 example.
The good thing about the practice time is that it only counts the time the student is really active. So, if they leave their screen open on the activity, it won’t be added to the practice time.
13. Planner
 The planner widget is, just like the WebQuest widget, a structure to build a step-by-step lesson or task. As a teacher, you can create an empty planner in which your students can choose their tasks, like this book report planner, or a planner that’s already filled up with tasks by the teacher, like this planner widget about the Marketing Mix.
Let’s take a look at the book report planner and see what live statistics you get. Check out the video below.
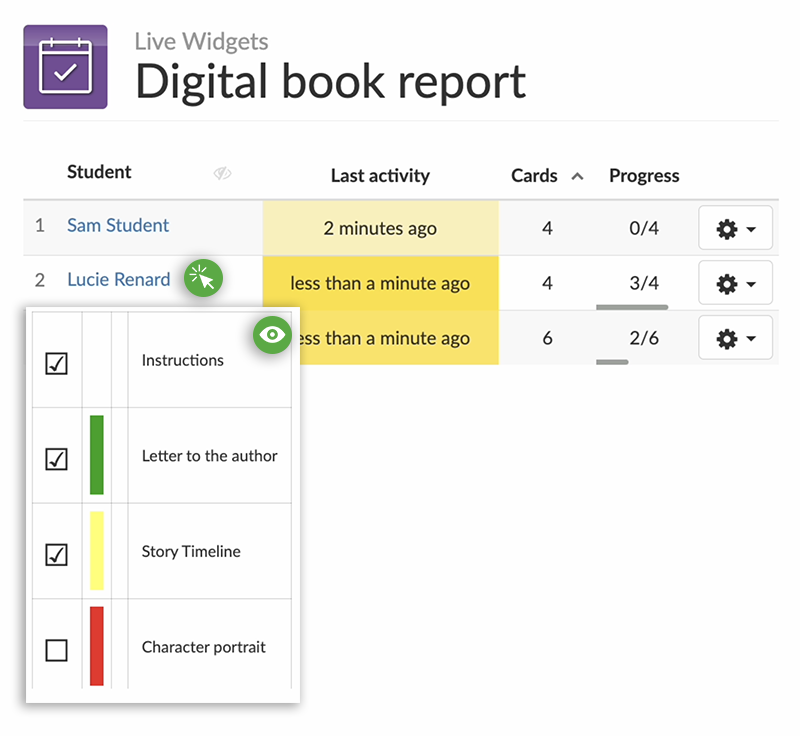
For each student, you can see how many Cards (or tasks) they have in their planner. In the situation above, Alix added 2 more cards to her planner than the others. You can also see the progress. This refers to how many cards (or tasks) your students checked off in their planner. If you click on the student’s name, you can see what tasks they choose to put in their planner, in which order, the colors these tasks have, and which ones they checked.
💡 Live Widgets Lesson Idea: Differentiation tasks
When you’re using a planner widget and letting your students choose to put in tasks, use the live widgets dashboard to quickly see the tasks each student picks and redirect students to other tasks if needed. Some chosen tasks might be too hard or too easy for them.
14. Checklist
 When you share a Checklist widget, you might want to follow up with your students to what they are checking off or to just see their progress. Here’s the checklist widget I shared. You can see the live statistics below.
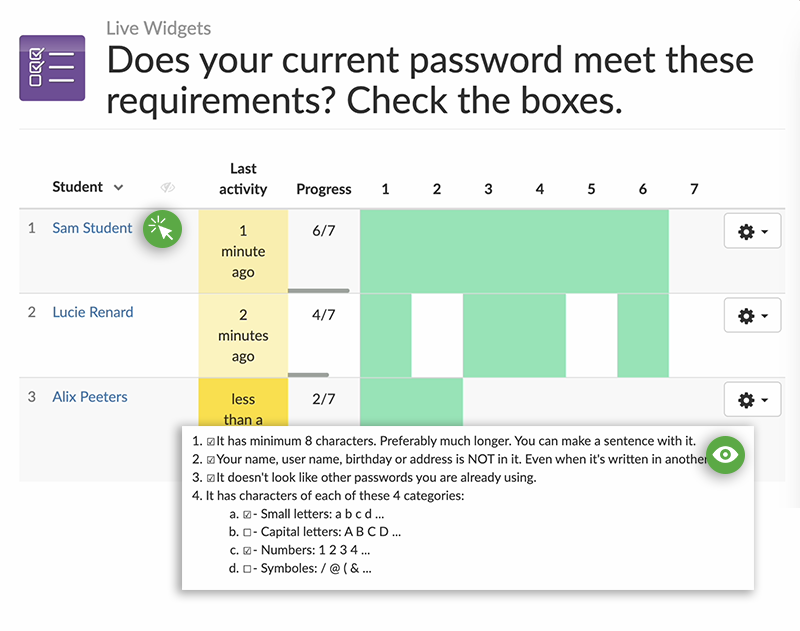
Besides the students’ names and the last activity, you can follow the progress. Here, you can see how many things your students have checked on their lists. You can also find the numbers for each check/ task in the checklist. When you hover over the number, you can see what the check/task stands for. A task in the checklist will be colored green when your students check it.
💡 Live Widgets Lesson Idea: Learning goals reflection checklist
Add all your learning goals of a big topic/ concept/ theme into a checklist widget. At the end of your lessons about that topic, ask your students to check the goals they think they achieved. Use the live widgets dashboard to sort the checked or unchecked goals, create different groups, and provide them with extra instructions and exercises on the learning objectives they didn’t check.
Wrap up
Fieeuw! That’s a lot! But now you have a clear understanding of what you can do with Live Widgets and how monitoring your students’ activity can benefit you and your students. Do you have more creative lesson ideas with Live Widgets? Share them in our Facebook Teacher Community or mention us on X. No, we didn’t forget a word… X is Twitter ;)
And me? I’m Lucie from BookWidgets. I’m happy to connect with you personally on X or LinkedIn.
