
20 Fun Interactive Ways for Teachers to Teach Biology
 Chelsey Both —
Discover 20 ready-to-use digital activities to teach biology interactively. Perfect for middle and high school students.
Tired of the same old biology lessons? Ready to bring some excitement and interaction into your classroom? Explore creative, hands-on activities that make complex biology concepts easy to grasp and fun to learn. Whether you want engaging icebreakers, quick reviews, or interactive homework ideas, this blog post has you covered!
You’ll discover a variety of interactive activities designed to make your biology lessons more engaging and effective. We’ll cover:
- Why Interactive Biology Lessons Work
- 20 Activities to Boost Your Biology Lessons
- Tips for Effective Use in Your Classroom
All of these NGSS-aligned biology activities follow the Next Generation Science Standards — a set of research-based goals designed to promote deep understanding of scientific concepts and practices. NGSS encourages hands-on exploration, modeling, and critical thinking over rote memorization. That’s why interactive tasks like labeling body systems, building timelines, and exploring cells with hotspots are such a great fit. These digital lessons help students think like scientists while mastering essential biology concepts.
Why Interactive Biology Lessons Work
Biology can be a challenging subject for students, filled with abstract processes, complex terminology, and detailed diagrams. That’s where interactive tools like BookWidgets make a difference. By turning lessons into hands-on experiences, you help students visualize systems, actively engage with content, and better retain key concepts. Whether it’s labeling a diagram, exploring a cell with hotspots, or sequencing the steps of mitosis, interactive learning brings biology to life. As Biology has a lot of visual lesson content, using a dual coding learning strategy will also help students remember the matter better. All the ready-to-use biology lessons in this blog post are made with BookWidgets, an interactive lesson builder tool for teachers.
💡 If you’re new to BookWidgets, it’s a platform that supports the full learning journey. Teachers can create interactive activities (aka “Widgets”) and assess student understanding from beginning to end. When integrated with a Learning Management System, BookWidgets offers “Live Widgets” that let teachers monitor student progress in real time, providing timely feedback and support.
20 Activities to Boost Your Biology Lessons
Interactive Biology Video Quiz Activity
 In a Video Quiz activity, you can assign questions of various types to time points in a video. The video will pause at each question to allow students to answer. With the Live Widgets feature, you can track student progress in real time and see who completed the homework. You can also use the quiz in class as a quick review or discussion starter to reinforce key concepts.
You can use a Video Quiz lesson in your biology class for flipped learning, or as a very clear visual aid that explains a raw concept much better than a teacher possibly can.
In a Video Quiz activity, you can assign questions of various types to time points in a video. The video will pause at each question to allow students to answer. With the Live Widgets feature, you can track student progress in real time and see who completed the homework. You can also use the quiz in class as a quick review or discussion starter to reinforce key concepts.
You can use a Video Quiz lesson in your biology class for flipped learning, or as a very clear visual aid that explains a raw concept much better than a teacher possibly can.
1. Cells vs Viruses
This biology Video Quiz on the lesson topic cells and viruses serves as a flipped learning assignment for students to complete at home before diving into a new biology topic in class. It provides a formative assessment to assess students’ understanding before the classroom discussion.
This activity aligns with NGSS: HS-LS1-1 — Structure and function of DNA and proteins

2. DNA and RNA Basics
Get ready to unravel the secrets of genetics with this interactive Video Quiz! This flipped learning assignment helps students understand the key differences between DNA and RNA before you even begin the topic in class. Through an engaging video and formative questions, this interactive science quiz builds foundational knowledge in genetics. Perfect for homework, review, or sparking class discussion!
This activity aligns with NGSS: HS-LS1-1 — Structure and function of DNA and proteins

Engaging Biology Whiteboard Drawing Activity
 In a Whiteboard activity, students can draw, write, and express their ideas visually on a digital canvas. It is perfect for open-ended tasks that promote creativity, critical thinking, and active learning. In biology lessons, students can label diagrams, illustrate biological processes, or visually explain their understanding of complex systems.. Whether you’re introducing a new concept, reviewing for a test, or encouraging students to think more deeply about a topic, the Whiteboard widget offers a flexible and engaging way to make abstract biological content more concrete and interactive.
3. Plant Biology Terms
Bring plant biology to life with this hands-on Whiteboard activity! Designed for middle and high school students, this visual review game helps reinforce key botany concepts before or after your lesson. One student draws a term like photosynthesis, leaf anatomy, or plant reproduction, while their partner guesses the concept. Then they switch roles for even more practice.
This activity fits perfectly among effective middle school life science review games, providing a fun and collaborative way to strengthen understanding of plant biology terms. It’s ideal for class warm-ups, review sessions, or station-based activities.
This activity aligns with NGSS: Varies by topic — good for reinforcing MS-LS1 series. Science Practice: Developing and using models

4. Human Anatomy
This interactive Whiteboard activity helps middle school biology students practice placing and labeling human organs in the correct locations on a digital body. Unlike traditional paper-based activities where students need to cut out and glue organ shapes, they can now simply drag and drop stickers onto the body and label them. It’s a quick and efficient way to reinforce organ placement and anatomy knowledge. This activity saves time and reduces classroom clutter while keeping students engaged in learning about human biology.
This activity aligns with NGSS: MS-LS1-3 — Body systems and subsystems
💡 Pro Tip! As a teacher, you can upload custom stickers (icons or images) for your students to use on the digital whiteboard. When they open the activity and click the star icon at the bottom of the page, they’ll see the stickers you’ve added. Students can then select from the list and adjust the position and size as needed.

5. Circulatory System
In this biology whiteboard activity, students actively map the direction of blood flow through major components of the circulatory system, including the heart, arteries, veins, and lungs. Using the digital whiteboard, they can easily correct mistakes and experiment with different pathways, promoting deeper understanding through trial and error. This practice reinforces key concepts such as oxygenated versus deoxygenated blood flow and the function of essential vessels. It also gives you a clear insight into student comprehension, allowing you to address any misconceptions before moving forward with the rest of your biology lesson.
This activity aligns with NGSS: MS-LS1-2 — Interacting subsystems in organisms

Interactive Biology Timeline Activity
 A Timeline Widget is perfect for teaching biological processes in a clear, structured way. It helps students visualize each step and supports active retrieval practice by encouraging them to recall or reorder the stages from memory. This approach not only reinforces complex biology concepts but also strengthens sequencing skills and promotes deeper learning.
6. Butterfly Life Cycle
This timeline activity centers on the butterfly life cycle, inviting students to actively build their own sequence of stages. The first card includes a link where they can find reliable information, and from there, it’s up to them to add cards representing each key moment in the butterfly’s development. Whether students use the provided resources or conduct their own research, this activity encourages independent learning and deepens their understanding of this fundamental biology concept.
This activity aligns with NGSS: 3-LS1-1 — Life cycles of organisms

7. Stages of Viral Infection
Explore the stages of a viral infection through a timeline activity where students arrange key events in their correct sequence. Students receive all the essential steps and work to place them in the right order. The timeline also includes typical days for each stage to support learning, but you can increase the challenge by removing these hints. This adaptable exercise helps students build a clearer picture of viral infections while strengthening sequencing skills in your biology class.
This activity aligns with NGSS: HS-LS1-2 — Organization of interacting systems

Engaging Before and After Comparison Activity in Biology
 The Before/After Widget lets students compare two images by sliding to reveal differences or blend them. This interactive tool enhances observation skills by highlighting visual changes or missing elements. It’s great for biology, helping students compare animals, habitats, and more. Using the slider encourages active analysis and deeper understanding. This widget offers a simple, visual way to support learning across subjects.
8. Anatomy of the Spine
Students compare two images of a spine. One without labels and the other showing all anatomical parts clearly named. Using the slider, they can smoothly switch between the unlabeled and labeled versions, reinforcing their knowledge of spinal anatomy. This visual comparison supports better understanding of key structures within the human skeletal system.
This activity aligns with NGSS: HS-LS1-2 — Develop and use a model to illustrate the hierarchical organization of interacting systems that provide specific functions within multicellular organisms.

Insightful Biology Hotspot Image Exercise
 A Hotspot Image Widget is ideal for giving students more control over their learning. It presents complex biology topics visually and interactively, allowing students to explore different parts of an image at their own pace. This flexibility makes it a great tool for differentiation, as students can choose how and where to begin based on their individual learning needs.
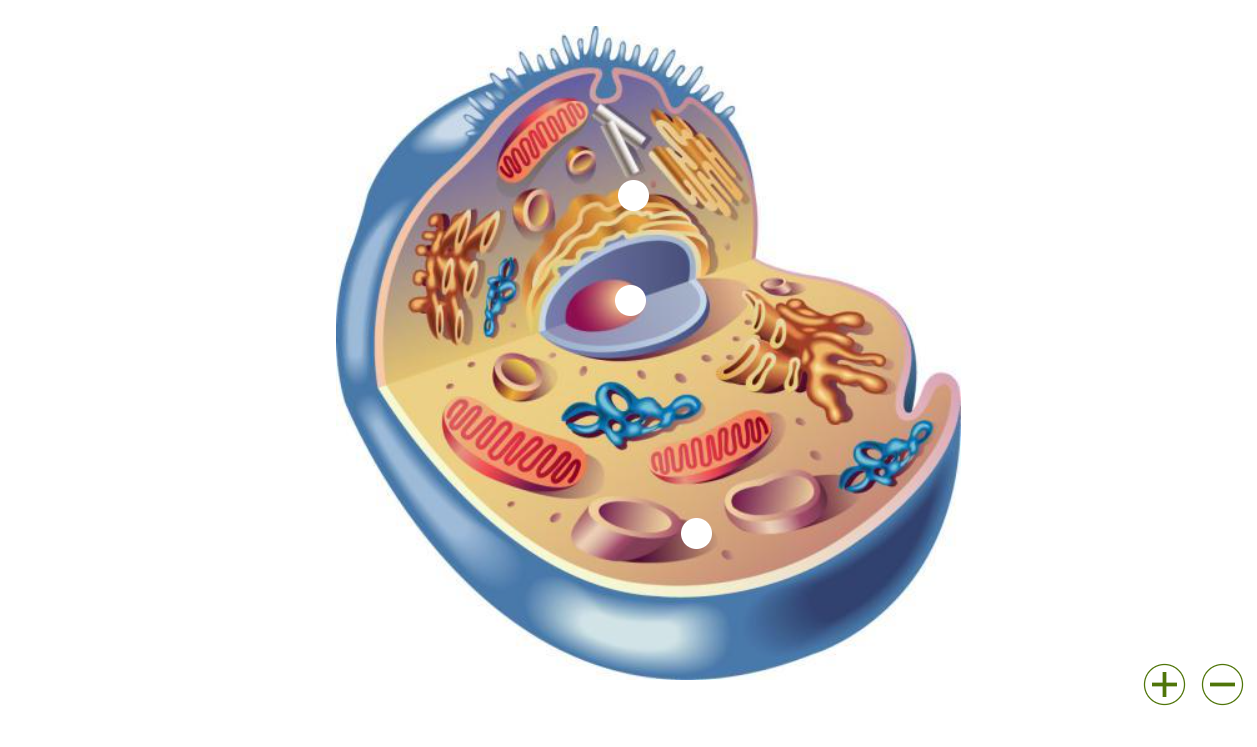
9. Human Cell Structure
In this example, students explore a human cell using hotspots that link to videos. Each clickable area reveals a different part of the cell, allowing students to watch short videos that explain the functions of the cell components. This interactive approach lets students control their learning journey, ensuring they can absorb the material at their own pace and focus on areas that interest them the most.
This activity aligns with NGSS: MS-LS1-2 — Cell structure and function
10. Human Body
Let your students explore the human body by clicking on different organs within the image. Each hotspot displays a clear picture of the selected organ, along with its name and function, helping students visualize and understand each part of the body. This engaging activity supports learning about human anatomy and promotes self-paced discovery.
This activity aligns with NGSS: MS-LS1-3 — Body systems and functions

11. Birdsong Recognition
The next Hotspot Image exercise centers on songbirds and their unique songs. Students interact with audio hotspots by clicking on various songbirds to hear their distinctive calls and melodies. This immersive activity encourages birdsong identification and fosters an appreciation for the diversity of songbird vocalizations. Great for short breaks or adding interactive variety to your biology lessons, it also helps students sharpen their listening skills.
This activity aligns with NGSS: MS-LS4-4 — Traits supporting survival and reproduction

Biology Split Worksheet Learning Exercise
 A Split Worksheet is a valuable tool in biology lessons, giving you the flexibility to combine multimedia with interactive student practice. On one side, you can add an audio clip, video, or short text explaining a biology concept. On the other side, students answer related questions. This format promotes active learning, helps your students better understand complex biological concepts, and makes it easier for them to apply what they’ve just learned.
12. Frogs and Their Characteristics
In the first example, the Split Worksheet is used to teach about frogs. On the right side, there’s a text about frogs, which you can format however you like. In this example, it’s a combination of an image and text, but you can also use headings, short paragraphs, or other formatting to guide your students. On the left side, you add questions based on the text. With 34 different question types available, you can fully customize the worksheet to match your lesson goals and keep students actively engaged with the content.
This activity aligns with NGSS: Can vary — e.g., MS-LS1-4 if about systems or structure. Science Practice: Constructing explanations from text

13. Podcast Listening Comprehension
The next Split Worksheet example uses a podcast to create an engaging listening comprehension exercise. Have you ever listened to an episode and thought, “My students really need to hear this”? This activity lets you easily add a podcast episode on one side of the worksheet, while the other side features guided questions that encourage students to actively listen, analyze, and reflect on the content. Using podcasts in your lessons promotes interactive learning and improves students’ critical listening skills. It’s a great way to bring authentic audio material into your classroom and enhance student engagement.
This activity aligns with NGSS: Varies — e.g., MS-LS2-1 or HS-LS2-6 for ecosystems or group behavior. Science Practice: Active listening and information analysis

Creative Biology Jigsaw Puzzle Game
 A Puzzle Widget is a fun way to review key biology terms and concepts through interactive play. It’s perfect for reinforcing vocabulary, processes, or diagrams in a visual and engaging format. You can use it for classroom review sessions, homework, or small group activities.
14. Plant and Animal Cell Puzzle
In this first puzzle activity, students complete a puzzle of a cell and decide whether it’s a plant cell or animal cell. It’s a fun energizer that gets them thinking and talking. Each part of the cell is numbered, and students work in pairs to discuss what each number represents.
This activity aligns with NGSS: MS-LS1-2 — Plant and animal cell differences
💡 Pro Tip! Combine this with another widget where students write down the name of each cell part. It’s a great way to check if they understood the lesson.

15. Animal Identification
The second puzzle activity features a picture of an animal. Students put the puzzle together and guess which animal it is. This makes a great ice-breaker if your next lesson focuses on that animal. You can easily swap the picture and adjust the number of puzzle pieces to fit your class needs.
This activity aligns with NGSS: 3-LS4-3 — Adaptation and traits for survival

Interactive Biology Spot The Difference Activity
 The Spot the Difference widget encourages students to carefully observe biological images and notice subtle changes. This sharpens their attention to detail and deepens their understanding of important biology concepts through active comparison.
16. Cell Comparison
For example, try this Spot the Difference activity where students compare a plant cell and an animal cell. Students find differences between the two, and when they click on a difference, a pop-up appears with an explanation. This ensures students engage thoughtfully and truly understand the key distinctions between plant and animal cells.
This activity aligns with NGSS: MS-LS1-2 — Cell structure comparison

17. Animal Comparison
Or are you looking for an example comparing two animals? Check out this Spot the Difference exercise where two types of elephants are compared. Just like before, clicking on a difference will show a pop-up with extra explanation to help students understand the distinctions.
This activity aligns with NGSS: MS-LS4-2 — Common ancestry from anatomical evidence
💡 Pro Tip! It doesn’t matter if the difference isn’t in the exact same spot on both images. You can highlight the difference separately on each picture.

Interactive Biology Quiz Knowledge Test
 The Quiz widget offers an interactive way to assess students’ understanding of biology concepts. It works perfectly as an icebreaker to check prior knowledge before starting a new topic and can also be used after a vacation to see if students still remember what they learned. This makes it ideal for reviewing material quickly while keeping students actively involved in the learning process.
18. Food Chain
In this example, students complete a Quiz focused on the food chain. With targeted questions on producers, primary and secondary consumers, decomposers, and energy transfer, the quiz helps students apply their knowledge of ecological roles and relationships. It’s a straightforward and effective way to assess their understanding of how energy moves through an ecosystem and ensure a solid foundation before continuing with your biology unit.
This activity aligns with NGSS: MS-LS2-3 — Food webs and matter cycling

Fun Biology Bingo Learning Game
 The Bingo widget is a great game to kick off your biology class and get students engaged right away. It’s perfect as an icebreaker that reviews key terms or concepts in a playful way, helping students warm up their brains and get ready to learn.
19. Animals and Habitats
The first Bingo game features photos of animals and different habitat types, such as deserts and rainforests. You can provide short descriptions, and students mark the correct image on their bingo card. This activity reinforces biology knowledge by helping students recognize both a variety of animals and the environments they live in, while also promoting careful listening and visual identification skills.
This activity aligns with NGSS: 3-LS4-3 — How habitats support survival

20. Photosynthesis Vocabulary
Make biology concepts stick with a bingo game that gets students actively thinking about photosynthesis. In this vocabulary-based activity, students listen to your clues and mark key photosynthesis terms such as chlorophyll, glucose, photosynthesis, and more on their bingo cards. As you call out definitions or descriptions, students have to connect the meaning to the correct scientific term, reinforcing both comprehension and recall.
This activity aligns with NGSS: MS-LS1-6 — Photosynthesis and energy in organisms

Tips for Getting Started with BookWidgets in Biology
Want to add more interactivity to your biology lessons? Here are a few simple tips to get started with BookWidgets in your classroom:
- Use existing templates: Start quickly with ready-made templates like the examples above that you can easily adapt for biology. All the activities mentioned in this blog can be found in our blog group folder. Feeling confident? Create your own widget from scratch to perfectly match your lesson.
- Keep it visual: Biology is visual by nature. Add diagrams, images, or videos to reinforce complex concepts like the circulatory system or photosynthesis.
- Test before you assign: Run through the widget yourself to catch any errors and ensure a smooth experience for your students.
- Encourage redo and reflection: BookWidgets allows students to try again, making it perfect for formative practice and deeper understanding.
- Start small: Try one widget in one lesson and build from there. Even small changes can lead to big engagement!
Wrap Up
And that’s it! Hopefully, you’ve gained plenty of virtual biology lesson ideas to make your students fall in love with biology. With BookWidgets, you can turn any lesson into an interactive and engaging experience that helps students truly understand and enjoy the subject. From quick reviews to in-depth explorations, there’s a widget for every part of your biology curriculum. All designed to support NGSS-aligned learning and help students develop critical scientific skills.
Do you have your own creative ways of using BookWidgets in your biology lessons? We’d love to hear from you! Share your ideas with us on Bluesky, LinkedIn, Instagram or join our Facebook teacher community to exchange inspiration with educators around the world.

